
How to wear your hair under a wig
The secret to a great look:
How you prep your natural hair underneath your wig dictates how natural, flat, and comfortable the wig will look and feel on your head.
The main objective:
The ultimate goal is to eliminate bulk and create a completely smooth, even foundation, preventing the wig from looking “puffy” or riding up.
Tailored to your hair type: There is no single correct way to prep; the best method depends entirely on whether your natural hair is short, long, fine, or thick
The Wig Cap
A wig cap is usually made of nylon fabric. It helps keep your natural hair in place and creates a smooth, flat base for your wig to sit on.
An optional choice:
Wearing a cap is entirely optional. If you prefer, you can wear your wig directly against your natural hair or the skin of your scalp.
Additional wig caps available to purchase here.
Swept back method
Ideal hair length: The swept-back method is perfect for anyone with short hair. It is quick, easy, and completely fuss-free.The pin technique: Simply comb your natural hair straight back away from your hairline, then secure the ends with a few bobby pins to keep it flat.
The gel alternative: Alternatively, you can use a small dab of hair gel to slick the hair back and keep stubborn stray hairs completely in place.
Standard Braids Method
The ultimate foundation: Braiding your natural hair is the most popular and effective way to prepare for a wig install, especially for medium to long hair lengths.
Flatness is key: Creating small, neat flat plaits distributes the bulk of your hair evenly across your scalp, preventing lumps and ensuring your wig sits completely flat and looks natural.
Protecting your hair: This method keeps your natural strands tucked away securely, reducing friction from the wig cap and promoting healthy, protective hair growth underneath.Simple removal: When you are ready to take off your wig, your natural hair remains organized and tangle-free, making your post-wig hair care routine quick and effortless.
Part the hair: Divide the hair into two equal sections by creating a clean centre parting from the front hairline straight down to the nape of the neck.
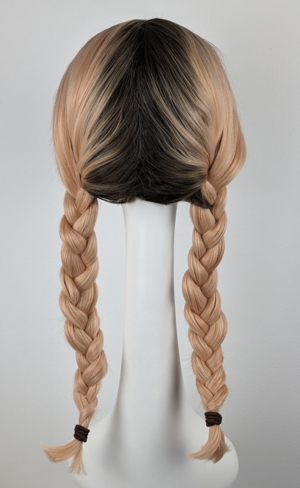
Braid both sides: Take the two separate sections of hair and create a tight, flat braid on each side of your head.
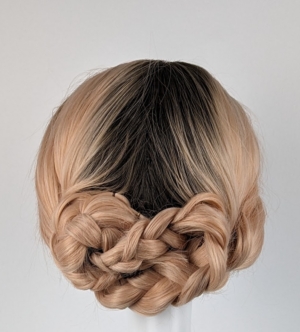
Cross the braids: Take the two braids and criss-cross them horizontally across the back of your head.
Prioritise flatness: They do not have to look perfect, as long as they sit flush and close to your scalp to eliminate bulk.
Pin securely: Anchor the ends of the braids firmly in place using bobby pins.
Cap for final security:
Place a wig cap over your prepared hair to hold the pinned braids firmly in place.
An optional step:
This step is entirely optional, but it helps create an extra smooth surface and prevents stray hairs from slipping out.
French Braids Method (Best for thick hair)
The French braids method is highly suited for thick or high-density hair types.
Maximum flatness: French braiding anchors the hair securely against the scalp, keeping the bulk as close to the head as possible.
Smooth foundation:
This technique prevents the wig from looking “puffy” or riding up, ensuring a smooth, natural-looking silhouette.
Part the hair: Divide the hair into two equal sections by creating a clean centre parting from the front hairline straight down to the nape of the neck.
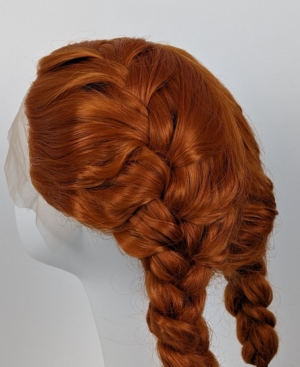
French braid both sides: Take the two separate sections of hair and create a tight, flat French braid on each side of your head.
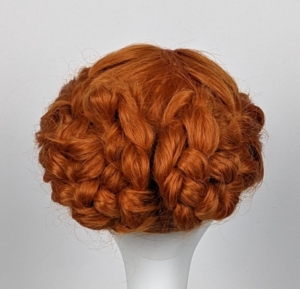
Pin into mini buns: Take the two separate braids and coil each one down securely at the back of your head, styling them like low space buns.
Secure with pins: Anchor the coiled buns firmly against your scalp using bobby pins to keep them as flat as possible.
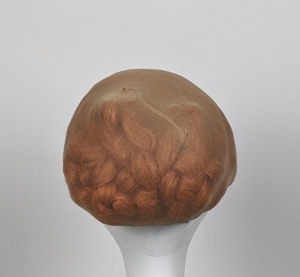
Cap for final security:
Place a wig cap over your prepared hair to hold the pinned braids firmly in place.
An optional step:
This step is entirely optional, but it helps create an extra smooth surface and prevents stray hairs from slipping out.
Pin curls method
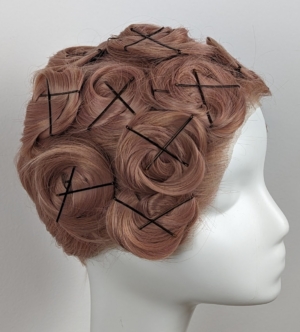
Please note the above picture shows multiple pin curls.
The Fine-Hair Pin Curl Method
Divide the hair:
Part and divide your natural hair into 4 even sections.
Form the curls:
Wrap each section into a flat, large coil against your scalp and secure it tightly with bobby pins.
Cap for security: Place a wig cap over your prepared hair to hold everything firmly in place. This step is entirely optional
A reliable option: You can absolutely use pin curls to create a beautifully flat foundation under your wig.
The time factor: However, creating multiple precise curls can be quite time-consuming, making this method less ideal for quick, everyday wear.
If you have any questions please don’t hesitate to contact us here