
How can we help?
Can I return an item?
Yes, we accept returns.
Please see our dedicated returns page for full information.
RETURNS
VAT relief
Am I able to apply for vat relief on my Lush Wig?
Yes, you are able to claim VAT relief on your wig purchase with Lush Wigs. If you are currently receiving chemotherapy, have alopecia or are chronically sick and have a disabling condition, you can claim VAT relief from this website.
You are able to claim back the VAT for each of your purchases as long as you qualify with any of the above conditions.
If for some reason you are unsure whether you can claim VAT relief, please contact your doctor for further clarification. You can also find useful advice by visiting HMRC Helpline website or call on 0300 123 1073, Option 1 for assistance.
Making a false declaration to the HMRC is fraudulent so please be sure that you qualify beforehand.
How do I claim VAT relief?
To claim VAT relief on your purchase just complete the declaration at the checkout stage of your order.
What products can I claim on?
You can claim VAT relief for any of our wigs and hairpieces. You are unable to claim VAT relief for any accessories.
How much is VAT relief?
The relief is currently 20%.
Terms and Conditions
VAT Relief Claims (Online) Under HMRC Reference: Notice 701/7 (August 2002)
- If you are eligible to reclaim VAT relief under the HMRC Reference: Notice 701/7 (August 2002), you can complete the form electronically during the checkout process.
- All orders must be placed by the person who is eligible to reclaim the VAT relief.
- Any incomplete relief information can prevent your order being processed correctly.
- VAT relief can only be applied to all qualifying items in your shopping basket at checkout.
- The online VAT Relief Claim Form is a personal declaration, electronically signing the form you are verifying that you are eligible to reclaim the VAT as defined in HMRC Reference: Notice 701/7 (August 2002).
- Please contact HMRC directly for all queries relating to eligibility.
- VAT relief claims under HMRC Reference: Notice 701/7 (August 2002) will not be processed for orders to the Channel Islands and outside the EU.
How to wear your hair under a wig
The secret to a great look:
How you prep your natural hair underneath your wig dictates how natural, flat, and comfortable the wig will look and feel on your head.
The main objective:
The ultimate goal is to eliminate bulk and create a completely smooth, even foundation, preventing the wig from looking “puffy” or riding up.
Tailored to your hair type: There is no single correct way to prep; the best method depends entirely on whether your natural hair is short, long, fine, or thick
The Wig Cap
A wig cap is usually made of nylon fabric. It helps keep your natural hair in place and creates a smooth, flat base for your wig to sit on.
An optional choice:
Wearing a cap is entirely optional. If you prefer, you can wear your wig directly against your natural hair or the skin of your scalp.
Additional wig caps available to purchase here.
Swept back method
Ideal hair length: The swept-back method is perfect for anyone with short hair. It is quick, easy, and completely fuss-free.The pin technique: Simply comb your natural hair straight back away from your hairline, then secure the ends with a few bobby pins to keep it flat.
The gel alternative: Alternatively, you can use a small dab of hair gel to slick the hair back and keep stubborn stray hairs completely in place.
Standard Braids Method
The ultimate foundation: Braiding your natural hair is the most popular and effective way to prepare for a wig install, especially for medium to long hair lengths.
Flatness is key: Creating small, neat flat plaits distributes the bulk of your hair evenly across your scalp, preventing lumps and ensuring your wig sits completely flat and looks natural.
Protecting your hair: This method keeps your natural strands tucked away securely, reducing friction from the wig cap and promoting healthy, protective hair growth underneath.Simple removal: When you are ready to take off your wig, your natural hair remains organized and tangle-free, making your post-wig hair care routine quick and effortless.
Part the hair: Divide the hair into two equal sections by creating a clean centre parting from the front hairline straight down to the nape of the neck.
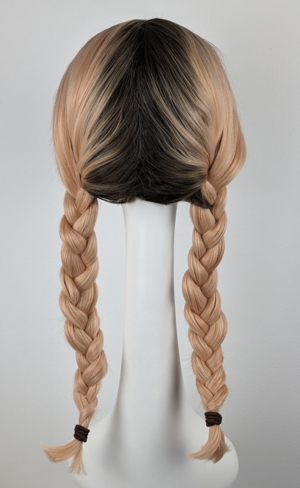
Braid both sides: Take the two separate sections of hair and create a tight, flat braid on each side of your head.
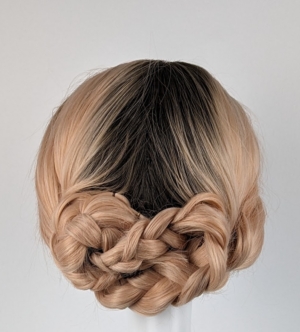
Cross the braids: Take the two braids and criss-cross them horizontally across the back of your head.
Prioritise flatness: They do not have to look perfect, as long as they sit flush and close to your scalp to eliminate bulk.
Pin securely: Anchor the ends of the braids firmly in place using bobby pins.
Cap for final security:
Place a wig cap over your prepared hair to hold the pinned braids firmly in place.
An optional step:
This step is entirely optional, but it helps create an extra smooth surface and prevents stray hairs from slipping out.
French Braids Method (Best for thick hair)
The French braids method is highly suited for thick or high-density hair types.
Maximum flatness: French braiding anchors the hair securely against the scalp, keeping the bulk as close to the head as possible.
Smooth foundation:
This technique prevents the wig from looking “puffy” or riding up, ensuring a smooth, natural-looking silhouette.
Part the hair: Divide the hair into two equal sections by creating a clean centre parting from the front hairline straight down to the nape of the neck.
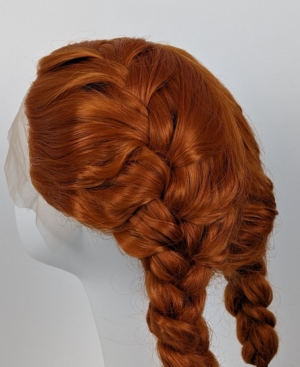
French braid both sides: Take the two separate sections of hair and create a tight, flat French braid on each side of your head.
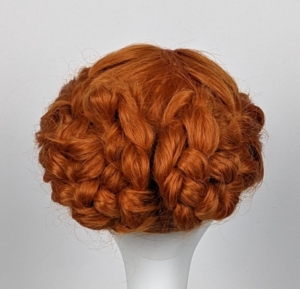
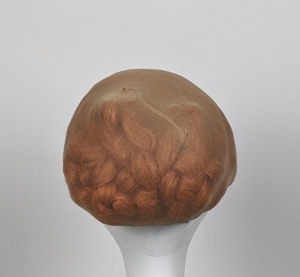
Pin into mini buns: Take the two separate braids and coil each one down securely at the back of your head, styling them like low space buns.
Secure with pins: Anchor the coiled buns firmly against your scalp using bobby pins to keep them as flat as possible.
Cap for final security:
Place a wig cap over your prepared hair to hold the pinned braids firmly in place.
An optional step:
This step is entirely optional, but it helps create an extra smooth surface and prevents stray hairs from slipping out.
Pin curls method
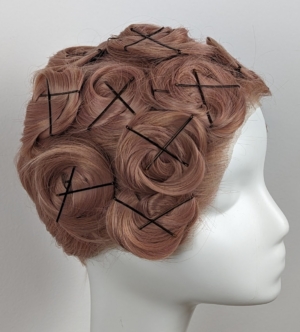
Please note the above picture shows multiple pin curls.
The Fine-Hair Pin Curl Method
Divide the hair:
Part and divide your natural hair into 4 even sections.
Form the curls:
Wrap each section into a flat, large coil against your scalp and secure it tightly with bobby pins.
Cap for security: Place a wig cap over your prepared hair to hold everything firmly in place. This step is entirely optional
A reliable option: You can absolutely use pin curls to create a beautifully flat foundation under your wig.
The time factor: However, creating multiple precise curls can be quite time-consuming, making this method less ideal for quick, everyday wear.
If you have any questions please don’t hesitate to contact us here
How to wash a synthetic wig
Proper aftercare is essential for maintaining your Lush Wig. With the right routine, you can maximize its lifespan, which averages 4–6 months for high-quality synthetic hair.
What You Will Need
Wide-tooth comb: Never use a nylon bristle brush, as it breaks synthetic fibers and causes static.
Bowl of lukewarm water: Avoid hot or boiling water, as intense heat permanently destroys synthetic styles (like curls or waves) and weakens the fibers.
Wig shampoo: use a specialist wig shampoo, like Synovation. Alternatively, a standard baby shampoo is an excellent, mild alternative if you do not have a wig shampoo to hand.
Conditioner: Use a dedicated wig conditioner try Synovation or a leave-in synthetic conditioning spray try
Cold water: Needed for the final rinse.
Towel: Microfiber towels offer the best absorption without causing frizz.
Wig stand: Optional, but ideal for the drying process.
Method
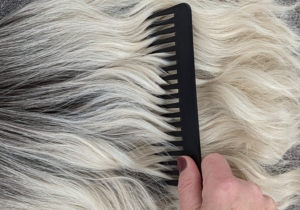
1. Detangle: Gently comb the wig from the ends upward using your wide-tooth comb.
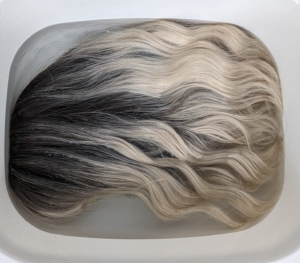
2. Soak: Mix a spoonful of shampoo into the lukewarm water, submerge the wig, and let it soak for 5 minutes.
Do not rub or scrub; instead, gently squeeze the wig.
3. Rinse: Rinse thoroughly in clean, cold water until all soap residue is gone.
Note: never wring out water as this will cause damage.
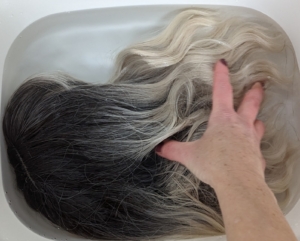
Conditioning
leave-in conditioner
If you’re using a leave-in conditioner, proceed directly to Step 5 and 6
Condition: Apply rinse-out conditioner from mid-lengths to ends, avoiding the wig cap, then rinse with cold water.
Drying
5. Dry: Blot gently with your microfiber towel to remove excess water.
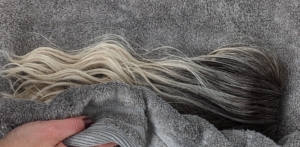
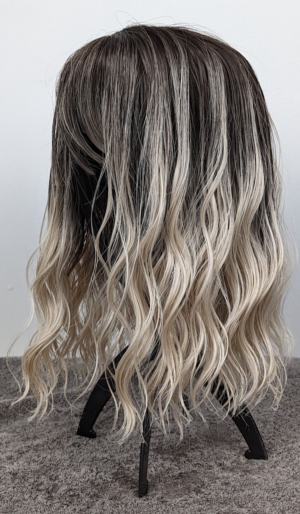
Air-dry on a wig stand. Alternatively, the wig can be left to dry lying flat on a towel.
Applying Leave-In Conditioner
6. Spray directly onto the damp synthetic fibres and comb through, then leave to air-dry.
note: A leave-in conditioner can be sprayed onto the damp hair and combed through. This can be a convenient option as you don’t have to rinse the product out. It can also work wonders for de-tangling your wig between washes
If you have any questions you want to ask, please get in touch here
Heat styling a synthetic wig
How to Safely Heat Style Your Synthetic Wig
Changing up your look is one of the best parts of wearing a wig. If you have been dreaming of turning your sleek, straight synthetic unit into a bouncy, wavy masterpiece—or vice versa—you absolutely can! However, unlike human hair, synthetic fibers require a completely different approach to thermal styling.
Before you plug in your curling wand, read this definitive guide to safely heat styling your synthetic wig without damaging the fibers.
The Golden Rule: Check the Label First
Rest assured, here at Lush Wigs all styles are heat-resistant; however, there are limits when it comes to how high your heat can go!
always keep your tools within the safe zone: 120°C to 140°C (250°F to 280°F). Going any higher risks permanently frizzing or melting the fibres
What You Need
Before getting started, gather your tools:
A canvas block head or styrofoam wig stand
Stainless steel T-pins to secure the wig
A wide-tooth comb or loop brush
Note: For further advice about what combs and brushes to use, please take a look here.
Hair sectioning clips
A digital hot tool (flat iron or curling wand with adjustable temperature)
Note: Your styling appliance does not have to be ceramic. Other types, such as those made from steel, are also compatible with synthetic fibres.
A specialised synthetic hair heat protectant spray
While there are many options on the market, most leave-in conditioners for synthetic hair will coat the fibres with a protective layer.
Prep and Detangle
Never apply heat to tangled fibre, as it will bake the knots permanently into the hair. Secure your wig to the styling head using T-pins through the ear tabs and the nape. Gently brush out any tangles starting from the ends and working your way up to the roots.
Spritz Your Protectant
Mist the hair lightly with a specialised synthetic wig heat protectant. This adds a barrier of moisture and helps the tool glide smoothly along the synthetic strands.
Work in Small Sections
Clip the bulk of the hair up, leaving only the lowest layer at the nape of the neck free. Working in small, 1-inch sections ensures even heat distribution and gives you much cleaner results. Tip: Always do a “strand test” on a hidden section at the very back first to verify your iron isn’t too hot.
Apply Heat Smoothly
To Straighten: Take your section and glide a flat iron smoothly from root to tip. Keep the iron moving at a steady pace—never let it sit on one spot.
To Curl: Wrap the hair smoothly around a curling barrel for about 5 to 8 seconds, then gently slide the wand out.
The Critical Step: Cool to Lock
This is where the magic happens. Human hair changes shape when it is hot, but synthetic fibre only locks into a new shape once it cools completely.
If you are straightening, hold the strand straight in your fingers until it cools.
If you are curling, catch the warm curl in your palm or pin it to the wig head with a clip. Leave it pinned until it is completely cold to the touch. If you let a warm synthetic curl drop, it will instantly fall flat.
Finish and Flaunt
Once the entire unit has cooled down completely (let it sit for about 15 minutes), remove the clips or pins. Use your fingers or a wide-tooth comb to gently fluff the curls or smooth down the straight layers.
Ready to Transform Your Look?
With the right temperature and a little patience, you can completely reinvent your favorite synthetic style. Just remember: keep the heat low to medium, and always let it cool!
Do you require discreet packaging?
If your order requires discreet packaging just select that option at checkout.
The only evidence of the word ‘Lush Wigs’ that will remain will be in small text on the customs declaration for customers outside of the UK.