How can we help?
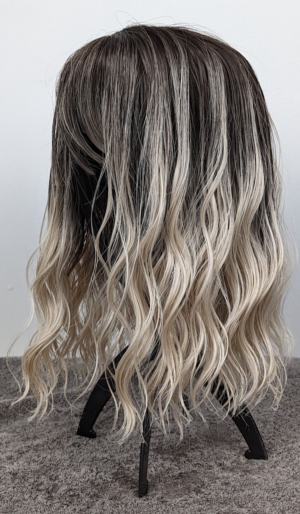
Wig construction cap, partings, sizes and colour
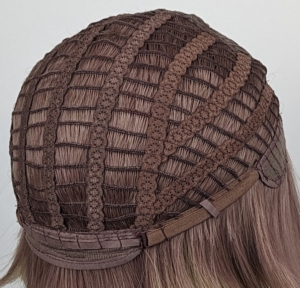
Wig Construction cap & size
The construction cap is breathable and light-weight, durable and stretchy. With adjustable fastening straps that hook into the desired tabs at the nape of the neck.
If you would like an exact measurement, please get in touch with your head size and wig preference here and we’ll measure it up for you.
Wig parting types
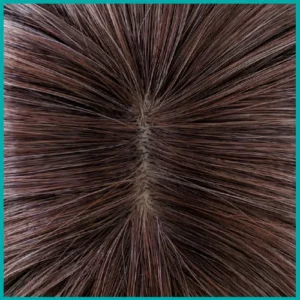
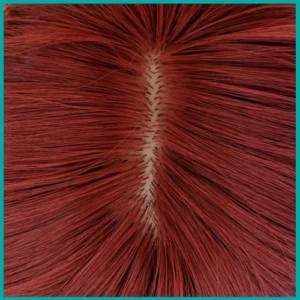
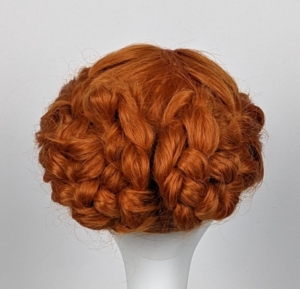
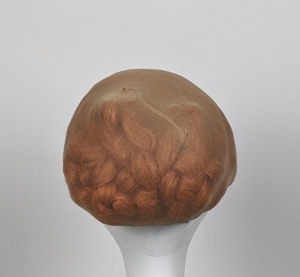
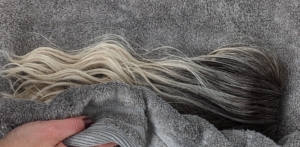
Skin top
Skin Top partings have a light coloured piece sewn into the cap to mimic a scalp. The hair is punched into this piece to give the effect of a real hair parting.
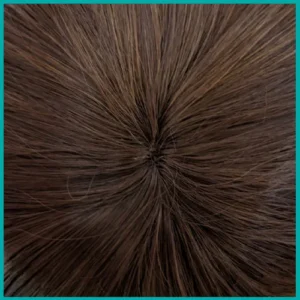
Closure
Closure top wigs are finished with a top piece that forms a circular crown.
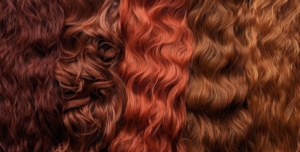
Colour
Please be aware that the colours may look slightly different in person due to your device screen settings, or instagram filters used.
Please contact us for any further information when it comes to colour. Our team are more than happy to send pictures of the wig you like on a mannequin and in natural light.
How to use Conditioner & Wig Fibre Oil
Wig maintenance can feel overwhelming with so many products on the market. Two of the most common products synthetic wig wearers confuse are leave-in conditioners and wig fibre oil sprays. While both keep alternative hair looking fresh, they serve entirely different purposes. Using the wrong one can leave your wig looking either dry and frizzy or heavy and greasy.
Here is everything you need to know about the differences between these two essentials and how to use them correctly.
The Core Differences at a Glance
Leave-In Conditioner: Water-based moisture designed to soften, hydrate, and untangle synthetic fibres.
Fibre Oil Spray: Oil- or silicone-based coat designed to restore shine, seal the fibre, and prevent friction frizz.
What is a Wig Leave-In Conditioner?
Synthetic wig leave-in conditioners are lightweight, water-based formulas. Because synthetic hair cannot absorb natural oils from a scalp, it relies on external, water-soluble moisture to stay soft.
Key Benefits
Deep Hydration: Infuses the synthetic strands with necessary moisture.
Static Reduction: Eliminates the static electricity that causes flyaways.
Daily Detangling: Adds enough “slip” to safely brush out knots without snapping the fibres.
When to Use It
Use leave-in conditioner as your daily maintenance spray. It is perfect to spritz on your wig first thing in the morning before brushing, or right after washing your wig while it is still damp.
What is a Wig Fibre Oil Spray?
Wig fibre oil sprays (often containing specialized silicones or light oils) do not moisturize. Instead, they act as a protective barrier and surface enhancer. Synthetic fibres lose their factory-applied protective coating over time due to weather, washing, and friction. Oil sprays replace that missing layer.
Key Benefits:Restores Brilliant Shine: Brings back the healthy, natural luster to dull, older wigs.
Friction Protection: Coats the nape area to prevent “carpet frizz” caused by rubbing against clothes.
Seals the Fibre: Locks in existing moisture and smooths down rough texture.
When to Use It
Use fibre oil sprays sparingly. They are best applied to the mid-lengths and ends of a wig, especially at the nape of the neck. Apply it every few wears, or when the wig starts to look dry, dull, and weathered.
Can You Use Both?
Yes, and for the best results, you should. Think of leave-in conditioner as the drink of water your wig needs, and the fibre oil spray as the raincoat that protects it.
For the ultimate care routine:
Spritz the wig lightly with leave-in conditioner to detangle and hydrate.
Gently brush the wig from the ends up to the roots.
Finish with a very light mist of fibre oil spray on the lower half of the wig to lock in the softness and add a healthy shine.
Tried and Tested products
Wig leave in-conditioners
Here are some tried and tested products that I can’t recommend highly enough:
Synovation Wig Conditioner – spray on
This has been on the market since 2004 and has excellent reviews online. It comes with a mild mint and cucumber fragrance.
Use after washing a wig and rinsing, just spray in and leave to dry. This can also be used for freshening a wig daily in-between washes.
African Essence Wig Control Spray
Since the late 1990’s this leave in conditioning spray acts as a 3 in 1 formula, delivering detangling, conditioning and added moisture. It comes with the conveniance to use on synthetic and human hair. The moisture quality acts as an oil for detangling. This comes with a light coconut fragrance.
Wig fibre oils
Synovation wig fire oil
While the core Synovation brand dates back to 2004, the Fibre Oil was specifically formulated later to solve a major issue that arose as mid-length and long synthetic wigs became highly popular in the 2010s
Use on dry hair, spray to the nape of the neck to help stop tangling and matting, if you have a very long style spray from the mid section, through to the ends of the hair.
Whatever you choose just bear in mind that a wig fibre oil spray is more for medium to very long hair, and this may not be needed for short bobs.
If you do experience matting with shoulder length styles, then incorporating an oil spray would be a benefit. You may find clothing plays a part, on a warm day wearing a straps or no collar top would not cause friction. However shirts, jumpers, especially with roll neck styles may cause a shoulder length style to tangle.
How To Revive Your Wig With Heat
All Lush Wigs styles are made from heat-resistant synthetic fibers. However, have you noticed your favorite wig getting frizzy, tangled, or stiff at the ends? It happens to the best of them. After weeks of friction against your clothes, sweat, and styling, the fibers naturally start to break down.
While it sounds backward, the secret to restoring that brand-new, silky-smooth look is actually more heat.
The Two Types of Heat
Dry Heat: Styling tools like hair dryers, hot brushes, curling wands, and straighteners.
Note: Heated hair tools do not have to be ceramic to style a synthetic wig. While ceramic is highly recommended because it distributes heat evenly and prevents dangerous hot spots, you can safely use titanium or metal tools—as long as the wig is made of heat-resistant synthetic fibers, which all Lush Wigs are.
Wet Heat (A Steamer): If using a heated styling tool feels too time-consuming or intimidating, steamers are a quick, convenient alternative. While specific synthetic wig steamers exist on the market, a regular fabric or clothes steamer reaches the same temperature and works exactly the same.
Note: Non-heat-resistant synthetic wigs will melt under dry heat tools. However, if you have non-heat-resistant wigs in your collection, the good news is that you can safely use wet heat (like a steamer) to revive them.
Unlike non-heat-resistant synthetic fibers that melt under flat irons, heat-resistant wigs are engineered to respond directly to temperature. Here is the science behind why your wig needs heat to snap back to life, and how you can do it safely at home.
The Science: Why Friction Ruins Your Wig
Synthetic hair is made of fine plastic polymers. When you wear your wig, the fibers constantly rub against your shoulders, neck, and clothing. This friction creates static electricity and microscopic scratches on the hair strands. Over time, these tiny imperfections cause the fibers to fray, leading to that dreaded “crunchy” texture at the nape of the neck.
Regular washing won’t fix this. Because the material is plastic, you have to gently melt those microscopic scratches flat again. That is where heat styling comes into play.
How Heat Restores the Fibers
When you apply controlled heat to a heat-resistant wig, you are essentially performing a mini-resurfacing treatment:
Smoothing the cuticle: The heat softens the plastic polymer just enough to flatten the frayed, scratched edges of the fiber.
Resetting the memory: Synthetic hair has a “built-in memory.” When heated and allowed to cool in a specific shape, it locks that shape in until heat is applied again.
Removing the frizz: Passing a hot tool over the frizzy sections stretches the fiber back into its original, sleek state.
Step-by-Step: How to Revive Your Wig
Temperature Check: Before you start, check your wig’s tag. Most heat-resistant wigs can handle between 130°C and 170°C (270°F to 340°F). We strongly advise using a medium heat setting of 140°C.
The Universal Prep Steps (Do This First)
Wash and dry: Wash the wig and let it dry completely. Never apply dry heat to a wet synthetic wig.
Detangle: Gently brush the wig while it is dry using a wide-tooth comb. Always start from the ends and work your way up to the roots.
Secure: Mount your wig to a canvas block head or a styrofoam stand using T-pins.
Method 1: The Handheld Steamer Method
(Best for Wavy and Curly Styles)
Prep the style: If you want to restore curls or waves, wrap sections of the hair around plastic rollers or flexi-rods.
Apply steam: Pass a handheld garment steamer slowly over the rolled sections. The hot steam softens the plastic without the risk of direct, burning contact.
Let it cool: Leave the rollers in until the wig is 100% dry and completely cool to the touch. Once you remove the rollers, the original bounce will be fully restored.
Method 2: The Flat Iron Method
(Best for Sleek and Straight Styles)
Section the hair: Work in small, manageable sections, starting at the nape of the neck where the most friction damage happens.
Set the temperature: Use a flat iron with a digital temperature display set to 140°C (medium heat). Test a small, hidden strand at the back of the wig first!
The comb-chase method: Place a fine-tooth comb in front of your flat iron. Pull the comb down the hair section slowly, followed immediately by the flat iron. This ensures the fibers are perfectly aligned as they heat up.
Let it cool: This is the most important step! Let the section hang straight and cool down completely. The style sets as the plastic cools, not while it is hot.
Maintenance Tips to Make the Revival Last
Use Synthetic-Safe Products: Standard human hair products leave a heavy film on synthetic fibers, which attracts dirt and increases friction.
Use Leave-In Synthetic Conditioner: Lightly spray a dedicated leave-in synthetic conditioner to coat the strands. This creates a protective layer that keeps the fibers smooth.
Invest in a Detangling Spray: Spritzing the lengths and the nape of the wig before wearing it drastically reduces friction against your skin and clothing.
Style Tip: This is excellent for any wig with a length below the jawline. If you have a pixie cut (like Elder) or a jaw-skimming bob (like Poppy), you do not need detangling spray, as the hair won’t rub against your shoulders.
Upgrade to Wig Fiber Oil: For ultra-long styles that past your shoulder blades and beyond (like Veronica), use a dedicated wig fiber oil instead of spray for heavy-duty protection against tangles.
Store It Right: When you are not wearing your wig, keep it on a wig stand or inside its original Lush Wigs bag. Shoving it into a drawer creates permanent creases and severe tangles.
Don’t give up on a frizzy wig! With a little patience and the right amount of heat, you can easily restore its shine and extend its lifespan.
How to wear your hair under a wig
The secret to a great look:
How you prep your natural hair underneath your wig dictates how natural, flat, and comfortable the wig will look and feel on your head.
The main objective:
The ultimate goal is to eliminate bulk and create a completely smooth, even foundation, preventing the wig from looking “puffy” or riding up.
Tailored to your hair type: There is no single correct way to prep; the best method depends entirely on whether your natural hair is short, long, fine, or thick
The Wig Cap
A wig cap is usually made of nylon fabric. It helps keep your natural hair in place and creates a smooth, flat base for your wig to sit on.
An optional choice:
Wearing a cap is entirely optional. If you prefer, you can wear your wig directly against your natural hair or the skin of your scalp.
Additional wig caps available to purchase here.
Swept back method
Ideal hair length: The swept-back method is perfect for anyone with short hair. It is quick, easy, and completely fuss-free.The pin technique: Simply comb your natural hair straight back away from your hairline, then secure the ends with a few bobby pins to keep it flat.
The gel alternative: Alternatively, you can use a small dab of hair gel to slick the hair back and keep stubborn stray hairs completely in place.
Standard Braids Method
The ultimate foundation: Braiding your natural hair is the most popular and effective way to prepare for a wig install, especially for medium to long hair lengths.
Flatness is key: Creating small, neat flat plaits distributes the bulk of your hair evenly across your scalp, preventing lumps and ensuring your wig sits completely flat and looks natural.
Protecting your hair: This method keeps your natural strands tucked away securely, reducing friction from the wig cap and promoting healthy, protective hair growth underneath.Simple removal: When you are ready to take off your wig, your natural hair remains organized and tangle-free, making your post-wig hair care routine quick and effortless.
Part the hair: Divide the hair into two equal sections by creating a clean centre parting from the front hairline straight down to the nape of the neck.
Braid both sides: Take the two separate sections of hair and create a tight, flat braid on each side of your head.
Cross the braids: Take the two braids and criss-cross them horizontally across the back of your head.
Prioritise flatness: They do not have to look perfect, as long as they sit flush and close to your scalp to eliminate bulk.
Pin securely: Anchor the ends of the braids firmly in place using bobby pins.
Cap for final security:
Place a wig cap over your prepared hair to hold the pinned braids firmly in place.
An optional step:
This step is entirely optional, but it helps create an extra smooth surface and prevents stray hairs from slipping out.
French Braids Method (Best for thick hair)
The French braids method is highly suited for thick or high-density hair types.
Maximum flatness: French braiding anchors the hair securely against the scalp, keeping the bulk as close to the head as possible.
Smooth foundation:
This technique prevents the wig from looking “puffy” or riding up, ensuring a smooth, natural-looking silhouette.
Part the hair: Divide the hair into two equal sections by creating a clean centre parting from the front hairline straight down to the nape of the neck.
French braid both sides: Take the two separate sections of hair and create a tight, flat French braid on each side of your head.
Pin into mini buns: Take the two separate braids and coil each one down securely at the back of your head, styling them like low space buns.
Secure with pins: Anchor the coiled buns firmly against your scalp using bobby pins to keep them as flat as possible.
Cap for final security:
Place a wig cap over your prepared hair to hold the pinned braids firmly in place.
An optional step:
This step is entirely optional, but it helps create an extra smooth surface and prevents stray hairs from slipping out.
Pin curls method
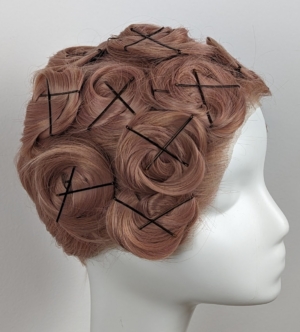
Please note the above picture shows multiple pin curls.
The Fine-Hair Pin Curl Method
Divide the hair:
Part and divide your natural hair into 4 even sections.
Form the curls:
Wrap each section into a flat, large coil against your scalp and secure it tightly with bobby pins.
Cap for security: Place a wig cap over your prepared hair to hold everything firmly in place. This step is entirely optional
A reliable option: You can absolutely use pin curls to create a beautifully flat foundation under your wig.
The time factor: However, creating multiple precise curls can be quite time-consuming, making this method less ideal for quick, everyday wear.
If you have any questions please don’t hesitate to contact us here
How to put on a wig and keeping it in place
How to put on a wig
Adjust the fit: Hold the wig at the nape where the adjustable straps are. Hook the straps into the desired slots. You may need some trial and error to find the most comfortable fit.
Position your hands: Hold the front hairline of the wig with one hand and the nape with the other hand. The inside of the wig cap should face upward.Slide it on: Tilt your head forward. Place the front of the wig against your natural front hairline, then pull the back of the wig down to the nape of your neck.
Check the alignment: Raise your head. Adjust the front edge so it lines up with your natural hairline. Ensure the sides sit comfortably and evenly around your ears.Fine-tune the security: If the wig feels too tight or too loose, remove it to adjust the straps and repeat the process.
If it feels to tight, or too loose you will need to adjust the straps, and apply again.
How to make a wig secure
Why use extra security? Some wigs need extra support to stay perfectly in place. Using specialized accessories will keep your wig secure and comfortable all day long.
Fabric wig grips: These velvety fabric bands feature velcro fastening to adjust to your head size. They are much kinder to sensitive scalps that experience pressure from clips or tight elastic.
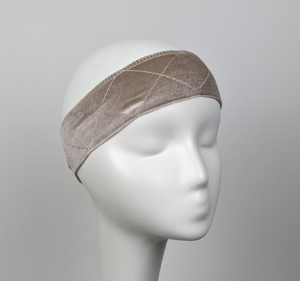
Fabric wig-grip
Available to purchase here
Glue
Wig glue application: Apply a thin layer of specialized wig glue directly along your hairline to bond the wig cap securely to your skin for an extended hold.
Safe glue removal: Never pull or yank the wig off. Apply an oil like coconut oil
or petroleum jelly (such as Vaseline) directly onto the dry glue to break down the adhesive.
Clean-up method: Gently wipe away the softened residue using a warm, damp flannel until your skin and the wig lace are completely clean.
Recommended Products
Ghostbond Classic: This liquid adhesive is a highly popular option for wigs. It goes on white but dries completely clear when set, leaving an invisible, seamless finish along your hairline.
Weather and sweat resistance: Formulated by Professional Hair Labs, it is specially designed to withstand high humidity, heavy perspiration, and oily skin without losing its hold.
Skin-friendly formula: It contains no latex, toxic ingredients, or harsh chemicals, making it completely safe and gentle for sensitive scalps.
A popular alternative
The got2b brand of hair-sculpting products is incredibly popular among the wig community.
The go-to products: Stylists and everyday wearers frequently use the Ultra Glued Invincible Styling Gel or the Glued Blasting Freeze Spray.
An accidental holy grail: While these products are not specifically marketed for gluing wigs down, their formulas are so uniquely sticky that they are tried, tested, and proven to keep a wig highly secure.
If you have any questions please contact us here
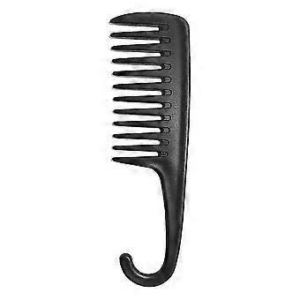
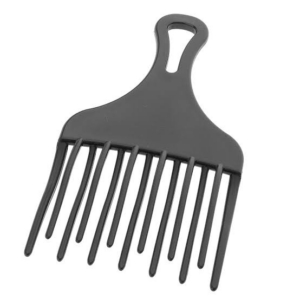
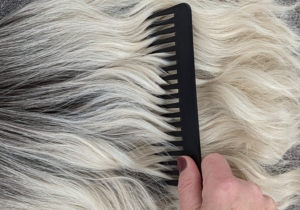
Hair brushes & combs for wigs
What combs and brushes to use for a synthetic wig?
A wig will require a brush just to remove any knots and tangles to keep your hair looking in top condition.
Synthetic hair is weaker when wet, so never use a brush as this would break wet hair. Always use a wide tooth-comb after washing.
Always start from the ends and work your way up in sections to remove tangles.
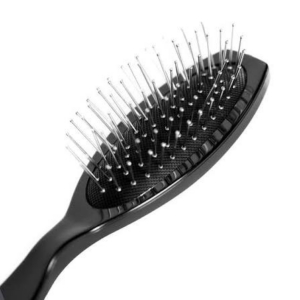
What Hair-Tools to use? metal? loop? plastic?
To care for a synthetic wig without causing frizz or shedding, you must avoid regular human hairbrushes, like a nylon bristle brush. Nylon will only cause static.
Instead, use a wide-tooth comb with smooth, rounded teeth to safely glide through the strands and release daily tangles.
For overall styling, opt for a specialised loop brush, which features looped bristles that won’t catch on the wig cap or snag the delicate synthetic fibres.
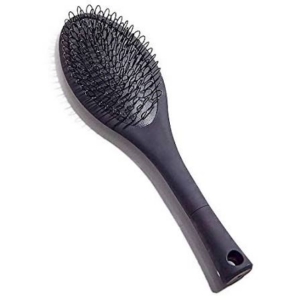
Alternatively, a wire-bristle wig brush is excellent for preventing static and friction.
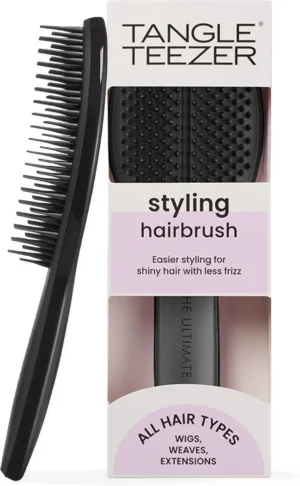
The Tangle Teezer has The Ultimate Styler Hairbrush designed for wigs. If you are using a standard detangler, opt for this version. Its teeth are 30% softer than the original model, which drastically minimizes the tension and pulling that stretches out synthetic hair fibres.
Caring for curly styles
If you are maintaining a curly synthetic wig, skip the brushes entirely and rely on a wide-tooth pick comb or simply use your fingers to gently separate and fluff the curls.
If you have any questions you want to ask, please get in touch here
How to wash a synthetic wig
Proper aftercare is essential for maintaining your Lush Wig. With the right routine, you can maximize its lifespan, which averages 4–6 months for high-quality synthetic hair.
What You Will Need
Wide-tooth comb: Never use a nylon bristle brush, as it breaks synthetic fibers and causes static.
Bowl of lukewarm water: Avoid hot or boiling water, as intense heat permanently destroys synthetic styles (like curls or waves) and weakens the fibers.
Wig shampoo: use a specialist wig shampoo, like Synovation. Alternatively, a standard baby shampoo is an excellent, mild alternative if you do not have a wig shampoo to hand.
Conditioner: Use a dedicated wig conditioner try Synovation or a leave-in synthetic conditioning spray try
Cold water: Needed for the final rinse.
Towel: Microfiber towels offer the best absorption without causing frizz.
Wig stand: Optional, but ideal for the drying process.
Method
1. Detangle: Gently comb the wig from the ends upward using your wide-tooth comb.
2. Soak: Mix a spoonful of shampoo into the lukewarm water, submerge the wig, and let it soak for 5 minutes.
Do not rub or scrub; instead, gently squeeze the wig.
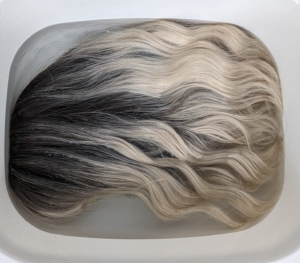
3. Rinse: Rinse thoroughly in clean, cold water until all soap residue is gone.
Note: never wring out water as this will cause damage.
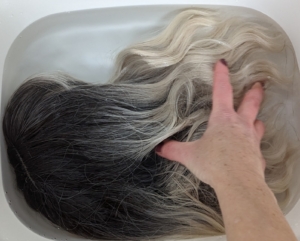
Conditioning
leave-in conditioner
If you’re using a leave-in conditioner, proceed directly to Step 5 and 6
Condition: Apply rinse-out conditioner from mid-lengths to ends, avoiding the wig cap, then rinse with cold water.
Drying
5. Dry: Blot gently with your microfiber towel to remove excess water.
Air-dry on a wig stand. Alternatively, the wig can be left to dry lying flat on a towel.
Applying Leave-In Conditioner
6. Spray directly onto the damp synthetic fibres and comb through, then leave to air-dry.
note: A leave-in conditioner can be sprayed onto the damp hair and combed through. This can be a convenient option as you don’t have to rinse the product out. It can also work wonders for de-tangling your wig between washes
If you have any questions you want to ask, please get in touch here
Heat styling a synthetic wig
How to Safely Heat Style Your Synthetic Wig
Changing up your look is one of the best parts of wearing a wig. If you have been dreaming of turning your sleek, straight synthetic unit into a bouncy, wavy masterpiece—or vice versa—you absolutely can! However, unlike human hair, synthetic fibers require a completely different approach to thermal styling.
Before you plug in your curling wand, read this definitive guide to safely heat styling your synthetic wig without damaging the fibers.
The Golden Rule: Check the Label First
Rest assured, here at Lush Wigs all styles are heat-resistant; however, there are limits when it comes to how high your heat can go!
always keep your tools within the safe zone: 120°C to 140°C (250°F to 280°F). Going any higher risks permanently frizzing or melting the fibres
What You Need
Before getting started, gather your tools:
A canvas block head or styrofoam wig stand
Stainless steel T-pins to secure the wig
A wide-tooth comb or loop brush
Note: For further advice about what combs and brushes to use, please take a look here.
Hair sectioning clips
A digital hot tool (flat iron or curling wand with adjustable temperature)
Note: Your styling appliance does not have to be ceramic. Other types, such as those made from steel, are also compatible with synthetic fibres.
A specialised synthetic hair heat protectant spray
While there are many options on the market, most leave-in conditioners for synthetic hair will coat the fibres with a protective layer.
Prep and Detangle
Never apply heat to tangled fibre, as it will bake the knots permanently into the hair. Secure your wig to the styling head using T-pins through the ear tabs and the nape. Gently brush out any tangles starting from the ends and working your way up to the roots.
Spritz Your Protectant
Mist the hair lightly with a specialised synthetic wig heat protectant. This adds a barrier of moisture and helps the tool glide smoothly along the synthetic strands.
Work in Small Sections
Clip the bulk of the hair up, leaving only the lowest layer at the nape of the neck free. Working in small, 1-inch sections ensures even heat distribution and gives you much cleaner results. Tip: Always do a “strand test” on a hidden section at the very back first to verify your iron isn’t too hot.
Apply Heat Smoothly
To Straighten: Take your section and glide a flat iron smoothly from root to tip. Keep the iron moving at a steady pace—never let it sit on one spot.
To Curl: Wrap the hair smoothly around a curling barrel for about 5 to 8 seconds, then gently slide the wand out.
The Critical Step: Cool to Lock
This is where the magic happens. Human hair changes shape when it is hot, but synthetic fibre only locks into a new shape once it cools completely.
If you are straightening, hold the strand straight in your fingers until it cools.
If you are curling, catch the warm curl in your palm or pin it to the wig head with a clip. Leave it pinned until it is completely cold to the touch. If you let a warm synthetic curl drop, it will instantly fall flat.
Finish and Flaunt
Once the entire unit has cooled down completely (let it sit for about 15 minutes), remove the clips or pins. Use your fingers or a wide-tooth comb to gently fluff the curls or smooth down the straight layers.
Ready to Transform Your Look?
With the right temperature and a little patience, you can completely reinvent your favorite synthetic style. Just remember: keep the heat low to medium, and always let it cool!
Storage Tips
Here are a few ways to keep your Lush wig in shape when you’re not wearing it.
These methods are for those who wear a wig on a regular basis.
Whatever you choose it will help keep the wig construction cap in shape at night when you’re sleeping.
The mannequin head
There are a variety of materials to choose from, hard plastic are durable, but a polystyrene head is a good budget alternative.

left:plastic head and right:polystyrene head.
Note: a long neck head is ideal for long styles.
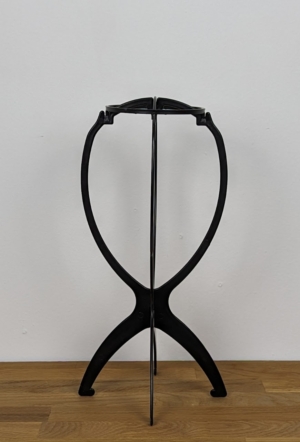
Wig stands
An airy alternative, good for drying wigs after a refresh.
Available to buy here
The Lush Wig Bag
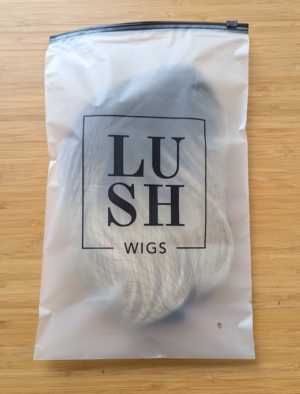
If you’re not planning to wear your wig it for some time, its best to store it in the lush wig bag.
If you have any questions you want to ask, please email us here
Dying a synthetic wig (at your own risk)
We regularly get emails asking us whether it’s OK to dye one of our wigs. We usually reply to these with a “well we wouldn’t recommend it…” but we know there is a way that has been proven to work, and has been endorsed by our own customers, so we thought we would tell you how it’s done!
It’s a great way to revive old styles you don’t wear anymore.
Note: boiling water can smooth out synthetic hair, if your wig was styled in curls when you boiled it though, these curls will not still be present after it dries. This process removes any style the wig had been set into.
You’ll need:
A light coloured wig that is heat resistant (all Lush Wigs are) – one of our light blondes is most likely to take dye, never try and put colour into a wig that already has colour in it. It will just ruin the wig.
Fabric dye – look into a brand that others have used on wigs, this differs worldwide. NEVER USE REGULAR HAIR DYE ON SYNTHETIC HAIR – it will melt!
A large pot – big enough to stir the wig around in with plenty of room for all the hair. If the hair is crammed in, you might not get even colour coverage.
Put some old clothes on just in case!
Method
Put your pot on the stove, and fill with enough water to completely cover your wig. Bring this water to the boil, then drop in your dye. You can control the colour at this stage, the more colour you add, the darker it’ll come out. If you want a washed out/pastel vibe, just a little will do.
As the water reaches boiling, run your wig under a tap to get it wet, this helps the dye take properly. Take the boiling pot off the heat, and put your wig in the water. Give it a mix around with a wooden spoon to make sure the colour gets to all the strands of hair. The longer it is in the water, the more of the colour it’ll take in. If you’ve made your water quite coloured and you only want a tint, take it out fairly quickly. It’s important that you keep an eye on the wig during this part, as it will determine how it looks, so remember not to leave it in too long if you don’t want an intense colour.
Once the wig looks the right colour, remove it from the water and rinse it under the cold tap. Do this until the water runs clear, like you would with regular hair dye. You can then lay your wig out and leave it to air dry.
Conclusion
This process is risky, factors like how well your wig has been looked after, the quality of fabric dye used etc. can all have an effect on the outcome, so please be careful, and as we said above, don’t do this on a wig you aren’t OK with potentially ruining. Having said that, you could bring an old wig back to life with a new look.
Wig photo information
All of our wigs are as pictured on models and customers.
Some choose to further style the wigs. Blunt fringes usually come longer so that the exact length can be cut to suit the individual.
In most cases you can view customers wearing the styles on the product page or via our Instagram hashtags. Use #lushwigs followed by the name of the wig. For example: #lushwigsplumjam. This may help you in deciding whether the style is what you are looking for.
All photographs are credited and must not be copied or used elsewhere without the express permission of each person involved (Model/customer, Photographer, Lush Wigs).