
How can we help?
How To Revive Your Wig With Heat
All Lush Wigs styles are made from heat-resistant synthetic fibers. However, have you noticed your favorite wig getting frizzy, tangled, or stiff at the ends? It happens to the best of them. After weeks of friction against your clothes, sweat, and styling, the fibers naturally start to break down.
While it sounds backward, the secret to restoring that brand-new, silky-smooth look is actually more heat.
The Two Types of Heat
Dry Heat: Styling tools like hair dryers, hot brushes, curling wands, and straighteners.
Note: Heated hair tools do not have to be ceramic to style a synthetic wig. While ceramic is highly recommended because it distributes heat evenly and prevents dangerous hot spots, you can safely use titanium or metal tools—as long as the wig is made of heat-resistant synthetic fibers, which all Lush Wigs are.
Wet Heat (A Steamer): If using a heated styling tool feels too time-consuming or intimidating, steamers are a quick, convenient alternative. While specific synthetic wig steamers exist on the market, a regular fabric or clothes steamer reaches the same temperature and works exactly the same.
Note: Non-heat-resistant synthetic wigs will melt under dry heat tools. However, if you have non-heat-resistant wigs in your collection, the good news is that you can safely use wet heat (like a steamer) to revive them.
Unlike non-heat-resistant synthetic fibers that melt under flat irons, heat-resistant wigs are engineered to respond directly to temperature. Here is the science behind why your wig needs heat to snap back to life, and how you can do it safely at home.
The Science: Why Friction Ruins Your Wig
Synthetic hair is made of fine plastic polymers. When you wear your wig, the fibers constantly rub against your shoulders, neck, and clothing. This friction creates static electricity and microscopic scratches on the hair strands. Over time, these tiny imperfections cause the fibers to fray, leading to that dreaded “crunchy” texture at the nape of the neck.
Regular washing won’t fix this. Because the material is plastic, you have to gently melt those microscopic scratches flat again. That is where heat styling comes into play.
How Heat Restores the Fibers
When you apply controlled heat to a heat-resistant wig, you are essentially performing a mini-resurfacing treatment:
Smoothing the cuticle: The heat softens the plastic polymer just enough to flatten the frayed, scratched edges of the fiber.
Resetting the memory: Synthetic hair has a “built-in memory.” When heated and allowed to cool in a specific shape, it locks that shape in until heat is applied again.
Removing the frizz: Passing a hot tool over the frizzy sections stretches the fiber back into its original, sleek state.
Step-by-Step: How to Revive Your Wig
Temperature Check: Before you start, check your wig’s tag. Most heat-resistant wigs can handle between 130°C and 170°C (270°F to 340°F). We strongly advise using a medium heat setting of 140°C.
The Universal Prep Steps (Do This First)
Wash and dry: Wash the wig and let it dry completely. Never apply dry heat to a wet synthetic wig.
Detangle: Gently brush the wig while it is dry using a wide-tooth comb. Always start from the ends and work your way up to the roots.
Secure: Mount your wig to a canvas block head or a styrofoam stand using T-pins.
Method 1: The Handheld Steamer Method
(Best for Wavy and Curly Styles)
Prep the style: If you want to restore curls or waves, wrap sections of the hair around plastic rollers or flexi-rods.
Apply steam: Pass a handheld garment steamer slowly over the rolled sections. The hot steam softens the plastic without the risk of direct, burning contact.
Let it cool: Leave the rollers in until the wig is 100% dry and completely cool to the touch. Once you remove the rollers, the original bounce will be fully restored.
Method 2: The Flat Iron Method
(Best for Sleek and Straight Styles)
Section the hair: Work in small, manageable sections, starting at the nape of the neck where the most friction damage happens.
Set the temperature: Use a flat iron with a digital temperature display set to 140°C (medium heat). Test a small, hidden strand at the back of the wig first!
The comb-chase method: Place a fine-tooth comb in front of your flat iron. Pull the comb down the hair section slowly, followed immediately by the flat iron. This ensures the fibers are perfectly aligned as they heat up.
Let it cool: This is the most important step! Let the section hang straight and cool down completely. The style sets as the plastic cools, not while it is hot.
Maintenance Tips to Make the Revival Last
Use Synthetic-Safe Products: Standard human hair products leave a heavy film on synthetic fibers, which attracts dirt and increases friction.
Use Leave-In Synthetic Conditioner: Lightly spray a dedicated leave-in synthetic conditioner to coat the strands. This creates a protective layer that keeps the fibers smooth.
Invest in a Detangling Spray: Spritzing the lengths and the nape of the wig before wearing it drastically reduces friction against your skin and clothing.
Style Tip: This is excellent for any wig with a length below the jawline. If you have a pixie cut (like Elder) or a jaw-skimming bob (like Poppy), you do not need detangling spray, as the hair won’t rub against your shoulders.
Upgrade to Wig Fiber Oil: For ultra-long styles that past your shoulder blades and beyond (like Veronica), use a dedicated wig fiber oil instead of spray for heavy-duty protection against tangles.
Store It Right: When you are not wearing your wig, keep it on a wig stand or inside its original Lush Wigs bag. Shoving it into a drawer creates permanent creases and severe tangles.
Don’t give up on a frizzy wig! With a little patience and the right amount of heat, you can easily restore its shine and extend its lifespan.
How to put on a wig and keeping it in place
How to put on a wig
Adjust the fit: Hold the wig at the nape where the adjustable straps are. Hook the straps into the desired slots. You may need some trial and error to find the most comfortable fit.
Position your hands: Hold the front hairline of the wig with one hand and the nape with the other hand. The inside of the wig cap should face upward.Slide it on: Tilt your head forward. Place the front of the wig against your natural front hairline, then pull the back of the wig down to the nape of your neck.
Check the alignment: Raise your head. Adjust the front edge so it lines up with your natural hairline. Ensure the sides sit comfortably and evenly around your ears.Fine-tune the security: If the wig feels too tight or too loose, remove it to adjust the straps and repeat the process.
If it feels to tight, or too loose you will need to adjust the straps, and apply again.
How to make a wig secure
Why use extra security? Some wigs need extra support to stay perfectly in place. Using specialized accessories will keep your wig secure and comfortable all day long.
Fabric wig grips: These velvety fabric bands feature velcro fastening to adjust to your head size. They are much kinder to sensitive scalps that experience pressure from clips or tight elastic.
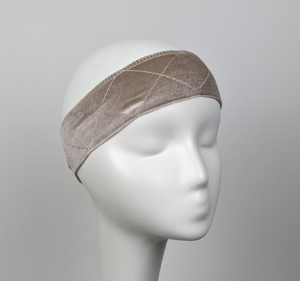
Fabric wig-grip
Available to purchase here
Glue
Wig glue application: Apply a thin layer of specialized wig glue directly along your hairline to bond the wig cap securely to your skin for an extended hold.
Safe glue removal: Never pull or yank the wig off. Apply an oil like coconut oil
or petroleum jelly (such as Vaseline) directly onto the dry glue to break down the adhesive.
Clean-up method: Gently wipe away the softened residue using a warm, damp flannel until your skin and the wig lace are completely clean.
Recommended Products
Ghostbond Classic: This liquid adhesive is a highly popular option for wigs. It goes on white but dries completely clear when set, leaving an invisible, seamless finish along your hairline.
Weather and sweat resistance: Formulated by Professional Hair Labs, it is specially designed to withstand high humidity, heavy perspiration, and oily skin without losing its hold.
Skin-friendly formula: It contains no latex, toxic ingredients, or harsh chemicals, making it completely safe and gentle for sensitive scalps.
A popular alternative
The got2b brand of hair-sculpting products is incredibly popular among the wig community.
The go-to products: Stylists and everyday wearers frequently use the Ultra Glued Invincible Styling Gel or the Glued Blasting Freeze Spray.
An accidental holy grail: While these products are not specifically marketed for gluing wigs down, their formulas are so uniquely sticky that they are tried, tested, and proven to keep a wig highly secure.
If you have any questions please contact us here